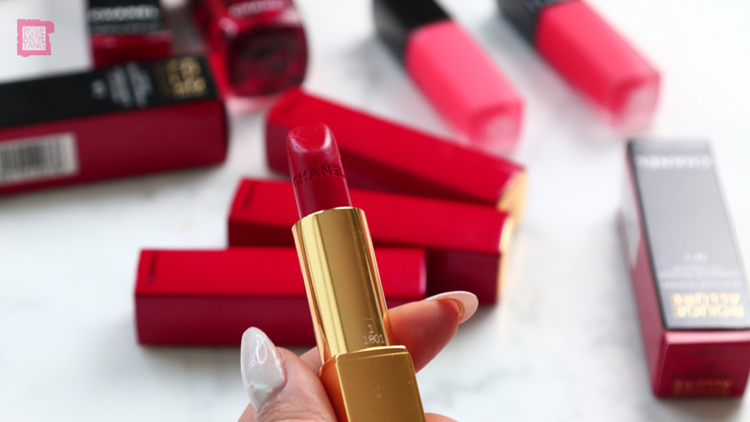
Hey Everyone, A red lip is undoubtedly a classic, and recently I’ve been noticing Chanel embracing the red lip more than ever before. Intorducing the Collection Libre 2017 collection and these, the NUMÉROS ROUGES which I’ll be talking about today. ”I want to have the red lipstick that CHANEL has chosen for…
Browsing CategoryReviews
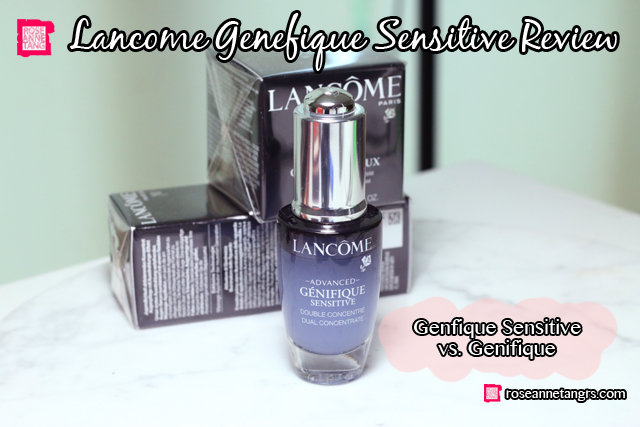
Lancome Advanced Genefique SENSITIVE vs. Youth Activating!
Hey Everyone! Today I’ll be doing a review of the Lancome Advanced Genifique Sensitive Dual Concentrate serum. As an avid fan of the Lancome Genefique range, especially the iconic Youth Activating Concentrate, I was pretty stoked when they came out with a serum that would help with sensitive skin. From…
I LOVE the Vaseline Spray Moisturizer!
Hey Everyone! If there’s one thing I’m lazy about – I have to admit – it’s putting on body moisturiser. I don’t know who else agrees but getting your hands covered in lotion, having to go back in for more and slathering it all over is a process I wish…
Dove Sensitive Body Wash!
Hey Everyone! We always talk about the best lotions and moisturisers but something that we use every single day can actually be the solution or the cause of your dry skin problems. For me, ever since I’ve been on accutane, it’s been a battle finding the right body wash for…
Hada Labo Hydration vs. Moisturisation & #Hadalabopledgetopat!
Hey Everyone! If there’s one skincare product I’ve been loving using lately, it’s the Hada Labo Super Hyaluronic Acid Hydrating Lotion. It’s been widely praised and talked about but I’ve only recently started using it and I love it. If you’re not familiar, Hada Labo is a skincare brand from Japan…
Silkygirl Matte Junkie Lip Cream & Perfect Sharp Eyeliner Review!
Hey Everyone! Today I’m super excited to share with you the new Silkygirl Matte Junkie Lip Cream and Perfect Sharp Eyeliner that I’ve been really liking and I can’t wait to give you my thoughts about them. Matte lip creams or lipsticks are all the range recently – they provide great…
My Honest Thoughts About Charlotte Tillbury Make-up
Hey Everyone! I managed to finally get my hands on Charlotte Tilbury during my trip to London a few weeks ago and since then I have been trying them out. I’ve finally gotten my thoughts together to write this and my honest opinions about their products. To me, Charlotte Tilbury…
Morning Routine with Clinique’s Even Better Dark Spot Corrector and Optimizer
Hey Everyone! Today I’m going to share with you my everyday morning skincare routine. Because I’m an avid make-up person, my morning routine is I think a little more special – I make sure I properly take care and protect it from things I’ll meet during the day and of…
Avalon Organics Deep Moisturizing Shampoo Awapuhi Mango Therapy from Smoochiezz!
Hey Everyone! Shampoo and conditioner, although sometimes underrated, are total beauty products to me because my hair can really have a life of its own. I’ve stopped using countless shampoos and conditioners because they made my hair heavy or greasy, especially the ones that claim to be hydrating. This isn’t…
Review: SILKYGIRL Magic BB All-in-One Powder Foundation & Matte Fever Lipcolor Balm!
Hey Everyone! I’ve never been a huge fan of powder foundations – they end up being cakey and dry and most of all, they don’t provide as much coverage as liquid foundations but I might start changing my mind. The new SILKYGIRL Magic BB All – in – One Powder…
Review: Dove Volume Nourishment Root Lift Spray! | The Best Midday Volumizer for your Hair!
Hey Everyone! I’ve met a lot of products that claim to give you instant volume, but I’ve never found one that really does. My hair gets super oily and limp in the evenings and late afternoons, especially when I’m tired. I’d say that sometimes it even has a life of…
How I Remove my Make-up with EVERSOFT!
Hey Everyone! Make-up removal is so important for me because due to the nature of my work, I’m an everyday make-up wearer! It’s such a nice feeling when you come home and take off your make-up but there’s nothing more annoying than when your cleansing product takes a really long…
My Thoughts on Acne Clear Pimple Treatment Cream!
Hey Everyone! Today I want to talk about something that bothers a great deal of girls out there – and something that I have been pestered with probably for years now. Acne. I’ve only recently gotten rid of the majority of my acne as you guys know from medication, but every…
Review: Curel BB Cream
Hey Everyone! Today I want to share with you a BB cream that I have been madly in love with – it’s the Curel BB Cream! I have been using it for about a month now and I love how suitable it is for people with sensitive skin like me…
Trying out the Skin Inc Get Glowin’ Brightening Mask
Hey Everyone! I’ve been trying out a face mask recently and it’s the new Skin Inc Get Glowin’ Brightening mask! You rarely get instant gratification from a single application of a product, and this mask changes the game. The Skin Inc Get Glowin’ Brightening Mask, formerly known as the Pure…
Brow Fightoff: Shu Uemura Hard Formula vs. Brow:Sword
Hey Everyone! I have been absolutely in love with two brow products lately – the Shu Uemura Hard Formula and Brow:sword. Both offer the chance at amazing brows but both shouldn’t be mistaken as the same. In fact, Hard Formula has been around for ages and Brow:sword is only a…
Review: KOSÉ Sekkisei Sunscreens – Sun Protect Essence Gel vs. Milk SPF50!
Hey Everyone! The perfect sunscreen for me is one that is lightweight and blends super well so that it leaves no white overcast and still offers me the protection I need. It’s been blistering hot in Singapore these days and a sunscreen is of utmost importance for everyone to be…
Review: Bobbi Brown Intensive Skin Serum Foundation SPF40
Hey Everyone! Today I’m doing a review of a new foundation find – the Bobbi Brown Intensive Skin Serum Foundation SPF 40 PA++. I’ll be giving you my honest opinion and a quick tutorial on how best to apply it. Foundation has always been a must-have for me – it…
Review: Chanel Sublimage La Protection UV SPF 50 Sunscreen!
Hey Everyone! I’m always on the hunt for a good sunscreen that does well under make-up. Most sunscreens out there leave a very oily residue and a white overcast when applied which often leaves your foundation slipping and sliding when you apply it over top. I’ve been using Chanel’s newest sunscreen…
Review: Chanel Rouge Coco Lipstick in Mademoiselle & Giveaway!
Hey Everyone! Today I’m going to do a review on a classic lipstick – the Chanel Rouge Coco in Mademoiselle. I’m an avid fan of Chanel’s Rouge Allure range so I was excited to try out the Rouge Coco range as they have been re-formulated! The Rouge Coco range is…
Review: The Body Shop Moisture White Shiso Overnight Triple Boost Serum
Hey Everyone! I’ve recently added a brand new serum to my nightly skincare routine and decided that today I wanted to share it with you! It’s the new The Body Shop Moisture White Shiso Overnight Triple Boost Serum. A serum is a skincare product that you apply after your toner…
Review: Shu Uemura Laque Supreme Lip Lacquers
Hey Everyone! Today I thought I would do a review of Shu Uemura’s latest lip lacquers – the Shu Uemura Laque Supreme. These are inspired by premium japanese lacquer ware and the packaging is gorgeous. I received the laque supreme gift box consisting of three of Shu Uemura’s laque supreme colors.…
Sephora Haul: Skincare & Foreo Luna Giveaway!
Hey Everyone! Sephora sends me some of their latest products from their exclusive brands, pretty much monthly. I usually post these amazing boxes on instagram but I have lately wanted to blog about them because they’re for sure an amazing opportunity for you and I to discover new or cool things!…
Review: Ziaja Sensitive 0% Skincare Range!
Hey Everyone! Today I want to talk about my current skincare routine! I thought I’d do this quick post before showering and getting ready for bed. The skincare range I’ve been using is the Ziaja sensitive skin range. I have been using this range for a few weeks already and…
Make-up Tutorial! Nude Lips & Plum Smokey Eyes ft. Brigitte!
Hey Everyone! Hello 2015! I just realised that this will be my first blog post of 2015. Woot! Today I thought I would try and do the classic smokey eyes and nude lips look. All celebs are sporting it on the red carpet and it’s just one of those never…
Trying Out IPL Hair Removal @ Ginza Calla Singapore!
Hey Everyone! How good would it be if you could max out the time you need to shave again? For me, it’s always such a hassle and dealing with shaving creams and razors are not fun. So after exploring other hair removal options, I thought I’d give IPL Hair Removal…
Review: Dior Diorskin Star Liquid Foundation!
Hey Everyone! I’ve always been more of a foundation girl, much more than bb or cc creams. It’s just that my skin has always been on perpetual breakout mode these days so I feel like I need the coverage and finding a good coverage foundation can be difficult. Some can…
Review: Sephora Smart Liner Liquid Eyeliner!
Hey Everyone! Today I just wanted to let you in on a pretty cool eyeliner find – the Sephora Smart Liner! Unlike your regular pen shapes, this one is bent and is supposed to follow the curve of your hand so that it feels like you have more control. I’ve…
Review: Aveda Elemental Nature Skincare – Tourmaline Charged & Outer Peace
Hey Everyone! I’m glad to say that my skin is finally getting better and better. That means I get to be more experimental with my skincare! I am truly a huge fan of Aveda products. Their Dry Remedy™shampoo has literally healed my hair after so much color and treatment damage…
Scent Favourite: Benefit Bathina – “Just Confess, You’re Obsessed” Body Mist !
Hey Everyone! I confess, I’m obsessed. When I pop the cap open and smell Bathina, it takes me back to my Uni days. I wore this scent during my 2nd year of Uni when my friend gave it to me as a gift. I started wearing it after my shower…
First Impressions: Lancôme Grandiôse Wide Angle Fan Effect Mascara
Hey Everyone! Lancôme launches a new mascara today – the Lancôme Grandiôse Wide-Angle Fan Effect Mascara! I was given this mascara to review pre-launch and I only had time to do it today so I thought I would instead voice out my honest first impressions of it. This mascara is where…
Review: Sephora Express Nail Polish Foam Removers – for Feet & for Glitter!
Hey Everyone! I am attracted to Sephora like bees to honey. It is probably my favourite store, ever. My boyfriend literally has to steer me away from that store and I’m sure you all feel the same way! Although Sephora brand products are not the first thing I choose to…
My Experience at the Aveda Experience Centre!
Hey Everyone! I am a total Aveda fan at the moment and I’m sure you have seen how their Smooth Infusion products have totally transformed my hair. Seriously, I love how their products feel so natural and they work! If you don’t know yet, the art and science of pure flower…
Rexona Shower Clean FRESH Anti-Perspirant Deodorant!
Hey Everyone! Smelling good and fresh is so important, especially in this hot and humid weather. For me, perfumes are great but they always fade on me and aren’t great solutions to smelling fresh throughout the day. Plus, you don’t just want to pile on fragrances on top of a…
Curél Sebum Trouble Care Skincare Range!
Hey Everyone! Today I just wanted to let you in on a new skincare range I’m trying out! As you know, I am still on the road to recovery with my acne and I need something that is great for oily & really sensitive skin like mine. I decided to…
My Top 7 Most Unique Indie Glitter Nail Polishes & Swatches!
Hey Everyone! I am sure we have all heard of mainstream nail polish brands like O.P.I, Essie and China Glaze, but what about indie nail polish brands? Indie nail polish brands tend to be better for you since often they are handmade, 5 – free (meaning that they do not…
How to Get Naturally Straight Hair & Aveda Smooth Infusion Styling Creme Review!
Hey Everyone! Ever since I had my hair dyed and basically damaged, I am always in need of great styling cremes to get my hair back in shape. I get loads of compliments on my hair but little does everyone know that I have to maintain it too. I even…
Quick Update: My Current Skin Journey with IDS Clinic & Theraclear & Hydrafacial Treatments
Hey Everyone! Today, I just wanted to give you a quick update about my journey with IDS clinic – it’s been a good four months already! IDS is a skin clinic that I have been regularly visiting to keep my acne issues under control and I have been really loving…
Review: Dior Addict Fluid Stick! – Mirage, Pandore, Wonderland & Aventure
Hey Everyone! Today I’m going to be doing a review on the Dior Addict Fluid Sticks. They’re a recent hit that I’ve been trying lately. These fluid sticks are basically liquid lipsticks or lip lacquers – a pigmented formula that is a mix between a gloss and a lipstick. Dior…
Review: 13rushes Makeup Brushes – The Best Brushes EVER!
Hey Everyone! I have to say that this post has been ridiculously overdue. Why? Well, these brushes are something that I can’t live without and even though I’ve shouted them out instagram, basically told everybody I know to get them and have just fell in love entirely, I have yet…
How To Strong Brows with M.A.C Spiked Eye Brows Pencil
Hey Everyone! I’ve been getting used to using an eyebrow pencil lately and have been really liking the strong brow look. I usually use an eyebrow powder but at times I feel that it can’t do super sharp lines and it’s pigmentation is obviously lacking too. It’s good as a…
Review & Tutorial: Lancome Hypnose Eye-shadow Palette Star Eyes – Brun Au Naturel
Hey Everyone! Today I’m going to be doing a review and tutorial of a gorgeous eye palette – the Lancome Hypnose Palette Star Eyes in Brun Au Naturel! I have been loving this lately and I also have another shade in Taupe Au Naturel. They give the prettiest and most…
Review & Lip Swatches: Rimmel Apocalips Lip Lacquers – in Stellar & Apocaliptic!
Hey Everyone! Today I will doing a review on a recent purchase in London – the Rimmel Apocalips! I first heard about these amazing lip lacquers from a fellow youtuber @sunnydahye who insisted I tried them. The recent withdrawal of all Rimmel products from Singapore didn’t allow me to so…
IDS Clinic with Dr. SK Tan – My Skin Doctor!
Hey Everyone! I have to be honest with you, my skin is pretty bad right now. Acne has always been an enemy to me and mine’s not a result of improper cleansing, it’s a matter of hormones which kind of makes things worse. I was born with PCOS which doesn’t…
How To Make a LUSH Love Lettuce Face Mask!
Hey Everyone! I have been a long time fan of LUSH fresh face masks. I remember in Uni, I used to buy one a week and my favourites were probably brazened honey, love lettuce and catastrophe cosmetic! LUSH Singapore invited me down for a special event to see how one…
My 3rd Trip to Kerring Skin – Rosa-C3 Mask, Phyto ExfoMousse Treatments
Hi Everyone! Today I want to share with you my experience during my third visit at Kerring Skin which is located at 60 Orchard Road, #07-07A International Building. They are a fab facial place that I feel is very comfortable and comforting. During my third visit, I wanted to try something…
Review: Lancôme Blanc Miracle Foundation!
Hey Everyone! Today I thought I might do a foundation review! It’s been a while since I’ve done one because my skin has been breaking out so badly. Thankfully though, it’s on the road to recovery. It’s like unpredictable weather really and it can go crazy in a matter of…
Review: Shu Uemura Caligraph:ink Eyeliner Pen!
Hey Everyone! Today, I’m going to be doing a review on the NEW Shu Uemura Caligraph:Ink Eyeliner. You’ve probably spotted it at basically every Shu Uemura counter and when I first saw it, being an eyeliner addict, I wanted to have it. To be honest, I was expecting this to…
Benefit Agent Zero Shine Review – An “on the go” Shine Vanishing Pro Powder!
Hey Everyone! I hate being caught with greasy skin and it’s really something I can’t control. My face just wants to be a discoball midday and there’s nothing I can do about it until I discovered make-up. I always touch up midday and there’s a couple products I really do recommend to…
My 2nd Trip to Kering Skin – Infrared Treatment & Mint Mask Review!
Hey Everyone! My skin has been really awful lately. I know it doesn’t look like it but my camera has been good to me and has decided that it shouldn’t pick up every single flaw. The month of feb has been really stressful for me. I’m working everyday and on…