Hey Everyone!
I remember my first time applying eye-shadow. I had no idea what went where nor did I have any knowledge of what the difference was between the outer v and the crease. Heck, I didn’t even know what they were called. That night, I went to Prom looking like the white ghost from Bel-Air. If she even exists.
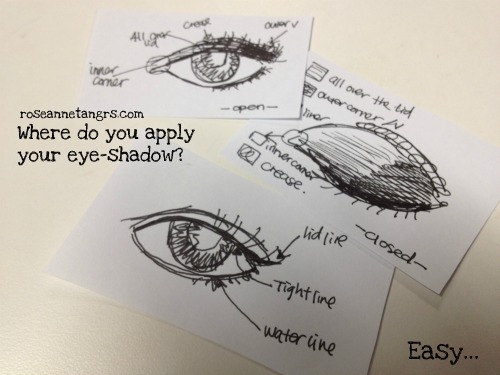
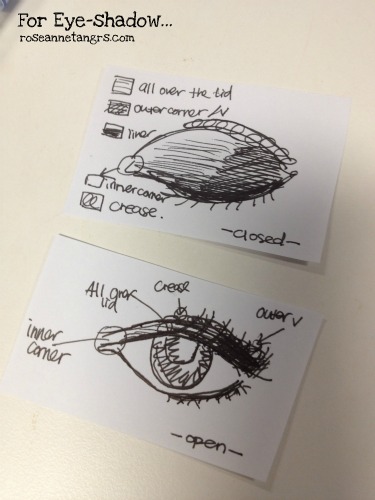
It all starts with the anatomy. I’m at work right now, whoops, and I decided I’d practice my drawing skills so I drew these drawings up above with my trusty Pilot pen.
The first thing is to get the anatomy right! It probably would be beneficial to identify the text with the label on the picture and flip back and forth if you’re a total make-up newbie!
Step 1: Lid
Where it is: This area of the eye is your entire lid. Often referred to as “all over the lid”. This is where your medium to light eye-shadow colors go – your light browns and beiges or lavenders to sky blues. It is the base shade of your entire eye-look. It is the “background color” to a work of art.
Colors to Use: Light to medium shades.
Brushes to use: Eye-shadow paddle brush, M.A.C 217
Step 2: Crease
Where it is: Your crease is the crease your eye makes when it opens. If you don’t have a prominent double eye-lid, it may be hard to find. this is great for opening up your eyes so make an artificial crease if you have to. It is the area near the roof of your eye-ball.
Colors to Use: Matte shades are best for the crease if you are going to use a glittery or shimmery shade all over the lid. Don’t use super dark shadows unless you are going to really go for a dramatic look. Something like a light to medium neutral will do but make sure it is darker than your lid color.
Brushes to Use: Fluffy, Small brushes to buff the color into the crease, M.A.C 224
Step 3: Outer Corner
Where it is: The outer corner of your eye is simply the outer half of your lid. See that dark area on the outer half of the eye? That’s the outer corner.
Colors to Use: You can shade your outer corner with a dark color which helps give your eyes depth and dimension.
Brushes to Use: Pencil Brushes or small paddle brushes
Step 4: Outer V
Where it is: This one is a little tricky but always a must do. Imagine finishing up a winged liner and then like a boomerang connecting it back to your crease. It frames the eye in a way and it’s almost like a sideways V around your eye.
Colors to Use: Matte Black, dark browns, dark plums
Brushes to Use: Pencil Brush
Note for eyes without a prominent crease, it’s good to concentrate your darkest colors not only in the outer corner but on the lid line working up. Check out my 5 Simple Tips for Getting Eye-Makeup right for Pretty Asian Eyes for more info!
Step 5: Inner Corner
Where it is: Your inner corner is where your tear duct is. It is the start of your eye. Michelle Phan is probably known for dominating this part with a white eye crayon of some sort. It’s known for brightening up your whole look. It doesn’t work for me though
Colors to Use: This area is for your lightest shades – your whites, sparkling beige and cream colors.
Brushes to use: Best to use a very small brush or just your fingertips.
There we go! To be honest, eye-shadow isn’t hard at all. You really need two shades – one lighter for your lid and one a darker shade for your outer v. After that, the rest is pretty much additional. You can experiment using eye-shadow on your water line for a smokey look or concentrate colors on different parts.
I know this was rather quick, but if you have any questions about eye-shadow, just comment below and I’ll get back to them! As you can see from the picture, I drew up a liner tip as well, I’ll be showcasing that in a future blog post.
xx Roseanne


