Hey Everyone!
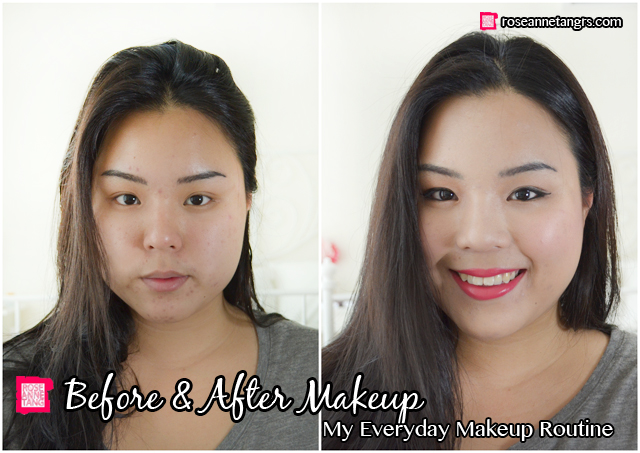
Today I thought I might do a make-up tutorial – I know, it’s been too long. I wanted to do an everyday make-up tutorial that shows you my before and after so as you can see from the starter image – that’s me before and that’s me after. I only realised that it really is such a huge difference when I was adding all the text to the pictures and I guess make-up does really work wonders right? For today’s look, I wanted to do an Asian makeup tutorial that I’ve been doing everyday. It’s those clean looking eyes but still made bigger with really bright lips. I always see this look with Kpop stars. I thought I would hop on the boat even though I don’t really look Korean at all.
With any look, you need to start with a great foundation. This goes on after you’ve applied your sunscreen or skincare products and the optional primer. Here, I am using the new Lancome Blanc Miracle Foundation that I did a review on already and I love it because it looks great, makes you appear brighter, feels very light while covering all your unwanted spots. I use a brush to attain more coverage but there are so many ways to apply foundation which you can find more about here.
Then it’s time for concealer. Use your fingers to apply a balm or cream concealer by patting it onto the blemish and blending it in small patting motions. I find this is the best for blending your concealer out while making it look flawless and maintaining the coverage.
It is so important to set with your powder. I use a stippling brush because the white bristles are very gentle and won’t rub or tug on my concealer and foundation. You can also use a fan brush. Gently sweep the powder to set your make-up. For higher coverage events like TV and events, you can use a powder sponge to dab the powder for max coverage and long wearing ability.
Now it’s time for eyes. Apply an eye primer all over the lid – this is so important because you want the shadows to appear more vivid and last all day. Then, apply your shadows over it. I’m doing a neutral eye look today so I’m going to first apply a shimmery sand all over the lid. By the way, that brush you see is from 13rushes which I have been obsessed with lately, you can get it here.
Then, apply a bit of dark born into your outer corner to give your eyes a bit of dimension. Don’t go too high with this color. Follow the natural contour of your eye.
Then I usually end up using a little matte black to define a bit the outer V and lash line.
For the eyeliner, make sure you line your water line, tight line and lash line. I usually use a liquid liner like the Shu Uemura Caligraph:ink pen for my lash line so I can do the nice wings. For my tight line and water line, I use the Guerlain Blackjack automatic pencil liner.
Mascara is so important to really open up the eyes! Make sure you use an eyelash curler beforehand to make your lashes stand and then use the mascara immediately to hold it up. I have lashes that always droop so I have to curl, apply one side then curl, apply the other side.
Now it’s time for contouring and blush! Simply contour your cheeks with a bronzer and then apply your blush. I’m using a pink blush for this tutorial to match my lips.
Probably the star of the show is lipstick. You gotta have a bright lipstick and my favourite of the moment is the Givenchy Le Rouge in Magnolia Organza. It’s a gorgeous hot pink that’s pretty and floral too. The lipstick is smooth and super pigmented.
You’re done with the make-up! Then I go ahead and blow dry my hair. Now that my hair is black, I wear it straight quite often. I always have to apply product nowadays after damaging it with dye so I’m using my ultimate favourite hair product of the moment – John Frieda Brilliant Brunette Liquid Shine Perfecting Glosser. This stuff is amazing. You only need a little bit and spread onto your hair.
Then, comb it through so that the product is distributed more evenly. I have been using the Tangle Teezer these days – actually for a while now – ever since I bought it in Taiwan. I love it! Except I don’t actually think that it really does comb out all the really tougher tangles. It for sure makes brushing your hair a smoother experience.
Then, I blowdry my hair! Instead of blowdrying it more professionally, I like the volume, just woke up look. I blowdry and then I scrunch the hair and fluff the hair near the roots as it’s drying. For me, this works great for volume.
You’re done! After blowdrying, I take a big clip and roll my hair into a bun on the top of my head and clip it. I go do other things and get ready and when it’s time to leave the house, I let it down and I get loose waves!
Hope you like my tutorial! I just wanted to let you all know that I’m going to Japan tomorrow!! I am so excited. Tokyo Luxey is flying me to Tokyo for Tokyo Fashion Week! I can’t wait to keep you guys updated on instagram @roseannetangrs during my whole trip!! So make sure you follow me, k?
Love,
Roseanne


